
Tutorial to Create the Instagram’s Kelvin Effect with Photoshop
Tutorial to Create the Instagram’s Kelvin Effect with Photoshop
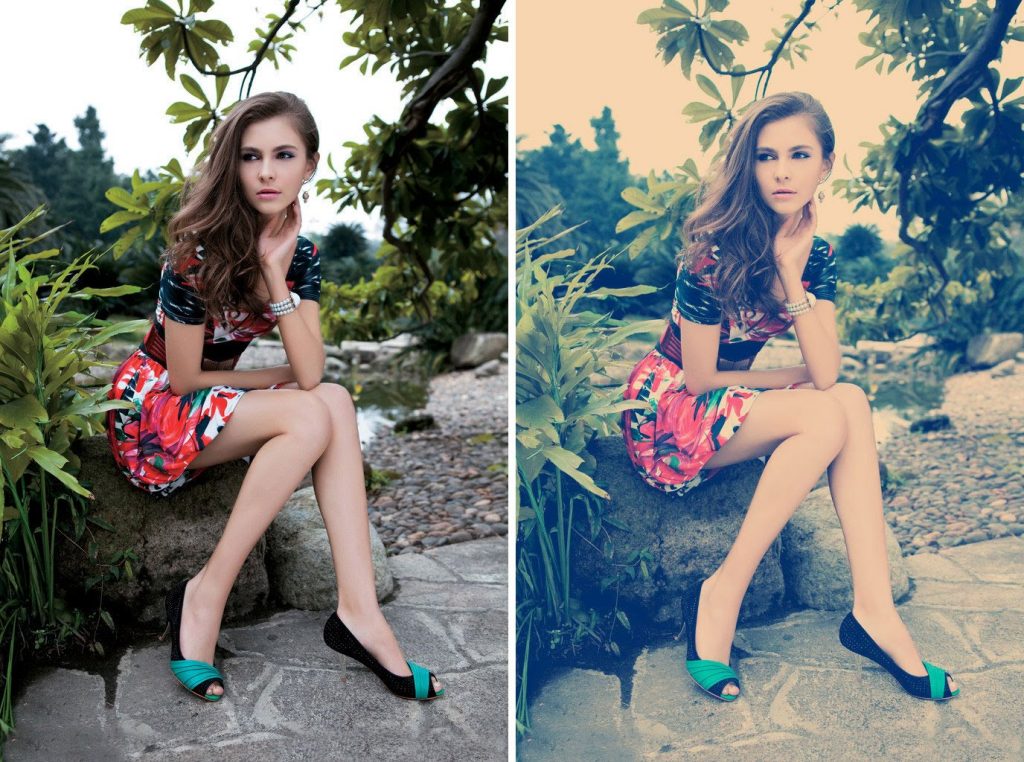
Instagram is the best platform to showcase your photography skills, and along with its 20 amazing filters, the task becomes easier. Here we will create the Instagram’s Kelvin filter with Photoshop for quick access to the enthusiastic graphic designers.
Contents
Let’s follow the steps to create the effect:
Step1:
Open the image in the window and create a new layer above the background layer. Press Ctrl+Shift+N/Command+N to create the new layer and name it “Noise”. Next, we have to turn the foreground colour black and fill the noise layer with black colour. Press D to change the foreground colour to black and Alt+backspace/Opt+Delete to fill the noise layer with black colour and at the end change the blending mode to screen.
Step2:
Now go to Filter>Noise>Add Noise to add noise and adjust the amount to 10-20%. Press Ok.
Step3:
After adding noise to the image, its time to manipulate the colour. For this go to Layer>New adjustment layer>Colour balance. Before adjusting the colour set the tone to “Shadow”. Now increase the cyan-red slider up to +23 and decrease the yellow-blue slider to -40.
Now change the tone to “Midtone” and increase the Cyan-red slider to +58 and decrease the yellow-blue slider to -53.
Finally, change the tone to “Highlight” and decrease the yellow-blue slider to -53 to which the image should look like this.
Step4:
After manipulating the colour balance of the image, let’s adjust the contrast of the image. For this go to Layer>New adjustment layer>levels. Now adjust the levels to 24-1-236.
Step5:
The final step is to add a vignette effect to the image. I will merge all the layers into one layer before adding the vignette effect. For this press Ctrl+Alt+Shift+E/ Command+opt+shift+E to merge all the layers into one. A new layer will appear on the layer panel after giving this command.
Now go to filter>lens correction and select the custom tab at the top of the box which appears on the screen. Increase the vignette to +20 and midpoint to +28 and press OK.
And we get the kelvin effect just in few minutes.

The final image.


