
Swapping The Sky Using Photoshop
Swapping The Sky Using Photoshop
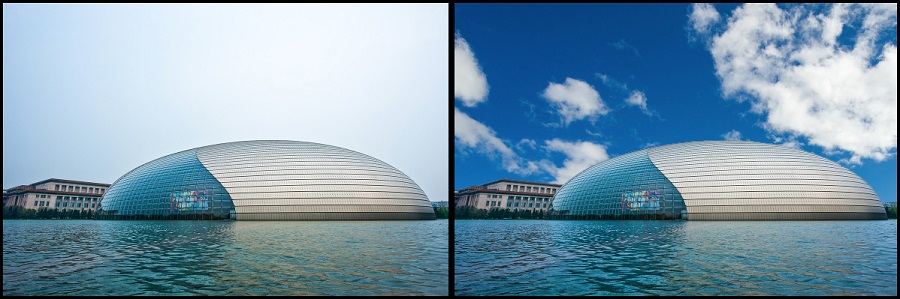
Sometimes your picture is perfect. But, the scenario of the sky doesn’t match the mood of the picture. All you need is two pictures- the one where you don’t like the sky, and the one whose sky you want. And then you can swap the sky using Photoshop.
Contents
Step 1:
Open the primary image- the one you want to edit- and press F7 to open layer panel and double click on ‘background’ layer to unlock.
Step 2:
Now go to Tool panel and select Magic Wand! Or, you can press shift+W repeatedly, until the desired option shows up. Now set the mode to ‘add selection’, and tolerance to 10 pixels in Panel set.
Step 3:
Now select your sky, and to further refine it click on Refine Edge in Options Panel. Then turn on Smart Radius and set the radius to 250 pixels, smooth to 100 and increase shift edge by 16%. Press OK.
Step 4:
Delete the selection by pressing delete and press ctrl+D to deselect the selections.
Step 5:
Now open the secondary image- the one whose sky you want- by going to File>open.
Halfway through swapping the sky using Photoshop, now.
Step 6:
Start with selecting Rectangular Marquee Tool to select the sky, and make sure that the mode is set to add to Selection. And make a big rectangle, covering the sky as much as it can. Don’t fuss over the small corners being left out.
Step 7:
Time to grab the Magic Wand! And select the remaining areas.
Step 8:
Now grab the Elliptical Marquee tool from the Tool Panel and start making circles across the areas left unselected.
Step 9:
Press ctrl+C to copy the selection and switch back to the primary image. Paste it by pressing ctrl+V. Drag Layer 1 to the bottom of the layer panel.
Step 10:
Press ctrl+T to activate Free Transform Tool and adjust the dimensions of the sky.
And now the final step to swap the sky using Photoshop.
Step 11:
To add a glow so that the horizon seems natural, activate Layer 0 and click on Add Layer Styles at the bottom of Layer Panel and click on Outer Glow.
Set the Blending Mode to normal and Outer Glow Colour to white. Increase the size to 136 pixels, or you can set it in accordance with your picture and press OK.
All hail the editing software! You have swapped the sky using Photoshop.


