Creating Cinematic Portrait Using Photoshop
We all are aware that Photoshop is a lifesaver for the artists like a photographer, graphic designers, etc., which caters their needs for creating and enhancing an image. We shall look into how using Photoshop, can we create a cinematic portrait effect. This requires a lot of adjustment layers and filter to achieve the desired results with the help of Photoshop CS6. However, older versions could also be used.
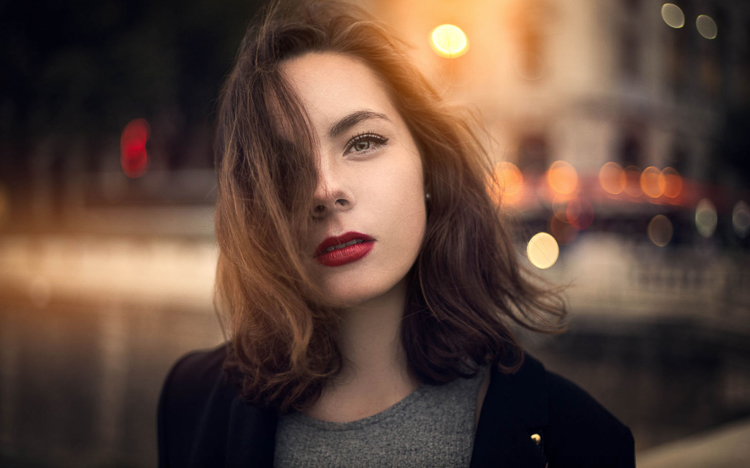
The image at the initial stage looks like the one below:
The following steps are to be adhered to achieve the desired effect:
Contents
Step 1 to create a Cinematic Portrait:
Finding out the width of the image is the first thing to be done. The width of the image could be found at the screen’s bottom.
The grids are to be set for which press Edit, Preference, Guide and lastly Grids and Slices. Write the value in the “Gridline Every” box after dividing the image width by 4 and press “ok”.
Press on View, Show, followed by Grids or simply press ctrl+’/cmd+’ for the grids to become visible.
Step 2 to create a Cinematic Portrait:
From the tool panel, catch hold of Single Row Marquee tool.
Press on the first horizontal grid and do not pay much attention to the perfection.
Tap on all horizontal grids by pressing and holding Shift. Select Single Column Marquee Tool and choose all the vertical grids. Leave Shift.
Step 3 to create a Cinematic Portrait:
By pressing Ctr+shift+N/Cmd+shift+N, create a new layer. Click D to make your background as white and foreground as black. To fill the newly created layer to white, click on Ctrl+Backspace/cmd+Delete. To deselect the selection, click on Ctrl+D/CMd+D.
Layer 1 to be renamed as “stroke”!
Now the grids are to be turned on.
Step 4 to create a Cinematic Portrait:
Enable “stroke” layer. Click on Layer, Layer Style followed by Stroke. Values can be adjusted as per the images are shown below.
Step 5 to create a Cinematic Portrait:
Click on Ctrl+shift+N/Cmd+Shift+N to create a new layer and renaming it to “White” thereafter. From the tool panel, choose the Rectangular Marquee Tool. Select the boxes by pressing shift.
Select Ctrl+backspace/Cmd+Delete to fill the selected region because the background has a white colour. For deselecting, press Ctrl+D/Cmd+D.
Step 6 to create a Cinematic Portrait:
Now the image has to be cropped because the lowermost stroke is undesirable. To do so, opt the Crop Tool from the tool panel for a crop that region.
Step 7 to create a Cinematic Portrait:
Press Ctrl+sift+N/Cmd+shift+N to create a new layer present at the top of the layer panel and rename it as “Black”. From the tool panel, choose the Rectangular Marquee Tool. Select the boxes as shown below by pressing and holding on to Shift.
Step 8 to create a Cinematic Portrait:
Select Alt+Backspace/Opt+Delete to fill the selected region with black as the foreground is of white colour. Change the Blend mode to Hue of the “black” layer. To deselect, press Ctrl+D/Cmd+D.
Step 9 to create a Cinematic Portrait:
To add contrast to the image, choose Layer, New Adjustment Layer and lastly, Curves. Linear Contrast should be set as preset.
Since the image has become darker, it should be fixed. To make it better, change the preset to Lighter. Now, Click on Layer, New Adjustment Layer and lastly Curves.
Step 10 to create a Cinematic Portrait:
Press on Ctrl+shift+N/Cmd+shift+N to create a new layer and let rename it as Vignette. From the tool panel, choose the Elliptical Marquee Tool. Try making an ellipse like the one shown below.
Click on Ctrl+shift+I/Cmd+shift+I for inverting the selection made.
Select Refine Edge via Select. The feather to be increased up to 150 pixels and press “ok”.
To fill the selection with black colour, click on Alt+Backspace/Opt+Delete as the foreground has black. To deselect, press on Ctrl+D/Cmd+D.
Step 11 to create a Cinematic Portrait:
Click on the layer thumbnail of layer- white, but before that, press Ctrl/Cmd. The pixels present in the “white” layer shall get loaded.
Enable the Vignette layer and press on Add Layer Mask.
The selection has to be inverted. Since the layer mask is enabled, press on the following: Ctrl+I/Cmd+I. The Vignette layer’s opacity to be reduced up to 50%.
Step 12 to create a Cinematic Portrait:
Press on Layer, New Adjustment Layer, and lastly Hue and Saturation. Saturation should be reduced to -50.
Step 13 to create a Cinematic Portrait:
We now have to enhance the eyes before which we need to create a new layer and naming it as Dodge. Press on Shift+5 or Edit, followed by Fill. Later on, turn the use to 50% of Gray and press “ok”. The mode has to be changed to Overlay from Blend Mode. From the tool panel, take the Dodge Tool or simply press on shift+O repeatedly until it appears. To lighten the iris in the image, apply the dodge brush on it.
Step 14 to create a Cinematic Portrait:
Rename the newly created layer as “Gradient” and make white as the colour of foreground. Press on shift+G repeatedly or from the tool panel, choose Gradient tool. Choose the type as a foreground to transparent from the options bar and mode as Linear Gradient.
By pressing Ctrl+(-)/Cmd+(-), zoom out of the image. To draw a straight line, press shift and lastly draw the gradient.
Resultant is shown below-
To add a bit more contrast to the image, press on the following- Layer, New Adjustment Layer and lastly, Curves and change the preset to Linear Contrast.
Yay! The final results are as the image shown below: