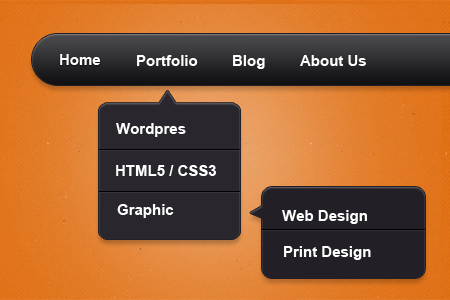
Creating Navigation Bar in Photoshop CS6

No doubt about the fact that Photoshop is the Superman or source of the last rescue! With the help of Photoshop, let us see how we can create a navigation bar in Photoshop. The version in use is Photoshop CS6, but the older versions can also be used.
Following are the steps for creating navigation bar:
Contents

Press Ctrl+N/Cmd+N to create a new document. Set resolution as 72 pixels/inch and dimensions as 4000 x 1200 pixels. Bigger the dimension, greater the flexibility. By pressing Ctrl+alt+I/Cd+Opt+I, one can reduce the size of the image, anytime.
Choose #363636 as the foreground colour. From the tool panel, select Rounded Rectangle Tool or simply press shift+U repeatedly until it appears. Having Rounded Rectangle Tool selected the option channel shall change. Change the mode to Shape from options panel. The fill colour shall also change to #363636. Stroke must be changed to no fill which adds borders to the rectangle that will be drawn. Set the radius to 50 pixels.
Draw the rectangle like illustrated in the image below.

Add the Layer Styles by pressing on add layer styles present at the bottom of the layer panel. Click on “Gradient Overlay”. To open a closed layer panel, press Windows followed by Layers or F7.
Without pressing on “ok”, change the setting as illustrated below. 
Without pressing on “ok”, click on the inner shadow and apply the setting as illustrated below.

Click on “Outer Glow” and change the setting as illustrated below and press “ok”.

The image shall look like the one shown below.
There is a need to create a new rounded rectangle shape. Firstly change the foreground colour by pressing #464646. Press shift+U repeatedly or select rounded rectangle tool out of tool panel and draw as illustrated below.
Add some layer styles to the layer created previously from the bottom of the layer panel and press on the inner shadow. Colour shall be #000000 and change the settings as illustrated below and do not press “ok”.
Press on Satin but not on “ok”.

Press on Gradient Overlay and then on “ok”.
The image shall look like the one below.
Duplicate “rounded rectangle 2” layer by pressing the following; layer – duplicate layer or Ctrl+J/Cmd+J. Enable Free Transform by following the series of options: Edit – Free Transform or simply press Ctrl+T or Cmd+T.
“Round rectangle 2” layer to be duplicated and position to be adjusted.
Create “currently active navigation bar”. Duplicate the “rectangle 2” layer and activate Free Transform Tool or press Ctrl+T/Cmd+T and adjust the position.
Readjustment is required for layer styles found at the bottom, from the layer panel and clicks on Gradient Overlay. Do remove the “satin and “inner shadow”. Do not press “ok”.
Gradient Overlay’s setting has to be changed as illustrated below.
The image shall look like the one shown below.

Press shift+T repeatedly or choose text tool from the left panel. Write “Form” or whatever you want to name it as. The font used here is Segoe UI. The size and position shall be fixed later.
To activate free transform tool, press ctrl+T/Cmd+T. To adjust the text size, do adjust the corner handles.
Fill rest of the boxes.

Enable “Background” layer by click on it. From the tool panel, select Gradient tool or press Shift+G repeatedly until it appears. Foreground colour to be changed to #00ff00 and #000000 as the background colour. Let mode be radial gradient which can be changed from options panel and foreground to background as the type.
To create a new gradient, drag and drop the mouse pointer on it.
This will make the image look like the one shown below.
To reduce the whites of the image, open the level adjustment panel by following: Image – Adjustment – Levels and press “ok”.

The image shall look like the one shown below. To reset the size, press the following: Image – Image Size or Ctr+Alt+I/Cmd+Opt+I.
Voila! The Navigation bar is ready to navigate! With the simple steps illustrated above, one can easily create Navigation bar via Photoshop.


