6 Easy Steps to Create the Walden Instagram Filter with Photoshop
6 Easy Steps to Create the Walden Instagram Filter with Photoshop
Instagram lovers! Here is good news for you. Today, we will learn to create the Walden Instagram effect with Photoshop. And it’s very easy to learn! Beginners can also take a chance to learn this.
Go ahead!
Contents
Step 1:
To start with the task I will first adjust the saturation and brightness of the image. To adjust the saturation go to layer>New adjustment layer>Hue and saturation. I will decrease the saturation to-38.
Now again go to layer>New adjustment layer and select brightness/contrast and increase the brightness to +26 and contrast to +62.

Step 2:
After adjusting the brightness, contrast and saturation, I will manipulate the colour of the image. For this go to Layer>New adjustment layer>Colour balance and select the tone as Midtone.
Now adjust the colours by moving the slider to the given value.
- First, decrease Cyan-Red slider to -27.
- After changing the Cyan-Red slider, now increase the Magenta-Green slider to +40.
- At last, increase the Yellow-Blue slider to +47.
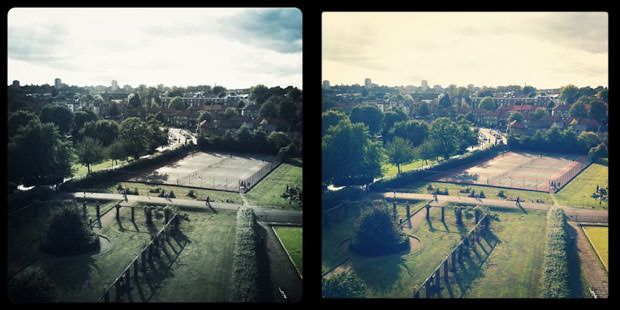
After this, the image should appear like this.

Step 3:
Now let’s move ahead to add the vignette effect to the image after colour manipulation. For this, I will create a new layer by pressing Ctrl+Shift+N/Command+shift+N. After this, I will take the elliptical marquee tool from the toolbox to the left and make a selection as shown in the image.
Now invert the selection by pressing Ctrl+shift+I.

Step 4:
As we make the selection, it’s time to add the feather effect to the selected area. Go to select and choose Refine edge to increase the feather up to 80 pixels. The pixels of the feather effect depends on the dimension of the image. The more of the dimension of the image, the more should be the pixels of the feather effect. After deciding the amount of pixel press OK.

Step 5:
After adding the feather effect, press D to change the foreground colour black. Press alt+backspace/Opt+Delete to fill the selection with the foreground colour. End the task by changing the blending mode to overlay and decrease the opacity to 87%. Now press Ctrl+D/Cmd+D to deselect the area of selection.
Step 6:
Now we will end the task by adjusting the saturation of the image. Go to layer>new adjustment layer>Hue/saturation and decrease the saturation to -23 and increase the lightness to +7.

And there you get the beautiful Walden filter with Photoshop. Try it now!