
Step By Step Tutorial For Inserting Image In A Text Using Photoshop Cs6
Photoshop has a wide array of tools to give your ideas a shape. Editing pictures in Photoshop is a passé; today we will play with text and images. Yes! It is a really interesting thing to learn, and this step by step guide will make you master the technique of inserting an image inside of a text.
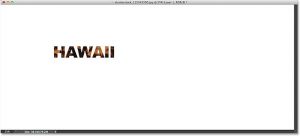
The final result we will get after going through this step by step tutorial is this,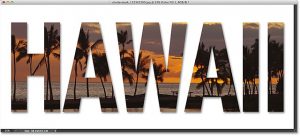
Before starting the tutorial, I will take an image for further steps.
So, let’s start the creative journey.
Step1: MAKE A DUPLICATE BACKGROUND LAYER
The first layer in the document is the background layer which will appear on the layer panel of the screen. As you will open the image which will be put inside the text will appear on the background layer.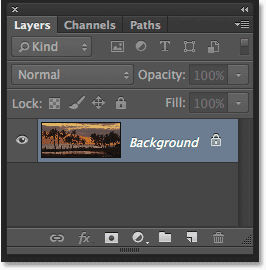
After this, I will make a copy of the background layer with the keyboard command (ctrl+J). The Photoshop will make a duplicate layer of the background layer and name it Layer 1. The Layer1 will appear just above the background layer in the layer panel.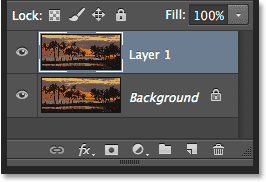
Step2: ADD A NEW SOLID FILL COLOUR LAYER
Now, it’s time to choose a background colour by using Photoshop’s solid fill colour layer. At the bottom of the layer panel, there is an adjustment and colour fill icon. When you click on the icon, a list will appear, and you have to click on the option Solid Colour.
As you will click on the Solid Colour option Photoshop will pop a colour picker to choose the colour for the background. I will choose white for my background colour.
The moment you will select the colour of a new layer named Colour Fill 1 will appear on the layer panel.
You will find the document turn white as the fill layer is at the top.
Step3: DRAG THE SOLID COLOUR LAYER UNDER LAYER1
After selecting the solid colour for the background, the preceding step is to drag the SOLID COLOUR FILL LAYER between the Layer1 and Background Layer.
You need to click on the Colour swatch icon on the left of the solid colour fill layer. As you will drag the layer down make sure it appears between the Layer1 and Background Layer.
As you will release the mouse button, the Image selected will reappear on the document.
Step4: SELECT THE TYPE TOOL AND CHOOSE THE FONT
The most interesting part of the tutorial comes when we have to select the text in which the image will be placed.
Select the Layer1 from the layer and find the text tool in the Photoshop Tool Box. The text box can simply appear to by pressing T on the keyboard.
After selecting the Text Tool, now we need to select an appropriate font to place the image within. Go to the Options bar at the top and choose a font of your interest. I am choosing the font ARIAL BLACK.
Step5: SET THE TYPE COLOUR WHITE
Preceding the steps after selecting the font of the text, we need to select the colour type WHITE. For this go to the colour swatch option at the options bar at the top.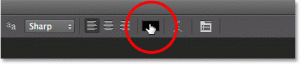
As you will select the colour swatch icon, the colour picker will appear on the screen. Select the white colour and click OK when you’re ready to go.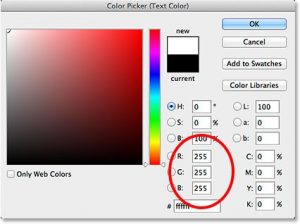
Step6: ADD THE TEXT
After setting the font and colour type, now the further step is to select the Layer1 and enter the text above the image. I will type “HAWAII”.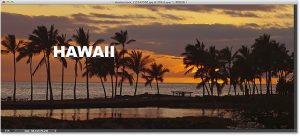
STEP7: DRAG THE TEXT LAYER UNDER LAYER 1
We need to drag the Text layer below the Layer1 to make sure the text doesn’t appear above the image.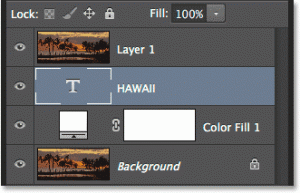
Drag the Text layer down and place it between the Colour Fill layer and Layer1.
Step8: CLIPPING MASK
Now the most interesting part comes when we had to the clipping mask to the layer.
Choose the Layer1 and go the small menu icon in the right of the layers panel. Choose the clipping mask to form the menu which appears on the screen.
This will clip the Layer1 and Text layer and gives an illusion that the image is inside the text. The remaining image will be replaced with the White colour fill background.
This will be the result after applying the clipping mask to the Layer1.
Step9: RESIZE AND REPOSITION THE TEXT
After the image is inserted into the text, now the text has to be resized and repositioned according to the frame.
For this select the Type Layer and press Ctrl+T (Windows) or Command+T (Mac) for free transform tool.
As the command is given a box appears across the text. Now you can drag the text and resize it accordingly.
When you are satisfied with the size and position, press Enter to deselect the Text.
Step10: DROP SHADOW EFFECT OF PHOTOSHOP
To give your text a drop shadow, select the Type Layer and click on the layer styles icon in the bottom of the layer panel.
Select the option of drop shadow from the list that appears on the screen. The final result after applying the drop shadow will be this.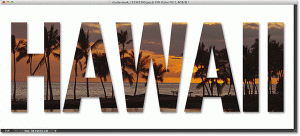
The Final Result.


