
Selecting Various Skin Tones in Photoshop
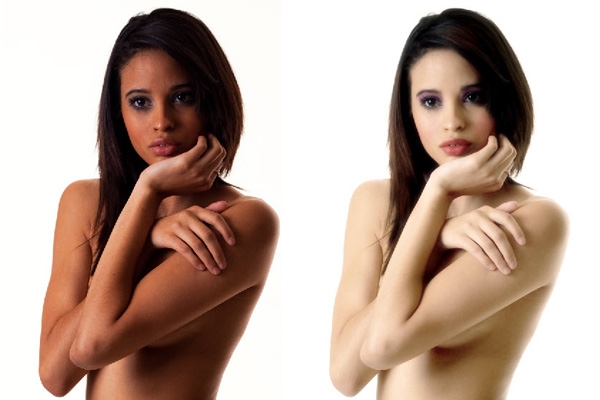
Photoshop is a useful tool that aids us in creating different effects in Photograph as we want to. The software has been a boon for all of those for whom photographs hold a special value. It enabled us to create every effect to suit our moods and also helped us to materialise our imaginations onto photographs. This article focuses on how selecting various skin tones in Photoshop CS6 and targets the inquisitiveness of a beginner towards using Photoshop effectively and fluently.
The steps involved in selecting Skin tones in Photoshop are as follows:
- First, open the image in Photoshop. After this, we click on Select>Color Range for opening the colour range box. Now we set the colour range as Skin Tones. This feature in specifically available in Photoshop CS6 and not in any of the previous versions. The next thing to do is to select ‘Detect Faces’. Now keep the Fuzziness slider in between value of 1 and 5. Next, select the ‘Invert Button’ and click OK.

- To improve your selection, press Q on the keyboard. This will switch on the Quick Selection Tool. Now you will see the image is covered with red colour. This is a temporary effect. The portions not covered with red colour are the selected area.


- The next step is to go to Tool panel and click on Brush Tool. Now set the percentage of hardness between 50 to 60. Now press D to change the foreground colour to Black and brush roughly over the area you don’t want to be selected.

- Now if you have left out some portions that you want to include in the selection then change the foreground colour to White and start brushing again.
- The next step is to rectify/modify the selection. To do this, zoom into the image by pressing Ctrl + (+)/ cmd + (+). After this, press ‘[’ to decrease the brush size and then start brushing over the area you want to select.

- Now we proceed to give a final modification to our selection. To do this, we need the Refine Edge Tool. Now press Q. This will automatically select the non-red area. Now open the Refine Edge Toolbox by pressing Ctrl + alt + R/ Cmd + opt + R. Change the settings as shown in the image below.

- Pressing OK in the previous step restores the selection in Photoshop. Now we press Ctrl + J/ Cmd + J to duplicate the selected area into a new layer. To reduce the highlight, we add ‘Curves’. For this click on Layer>New adjustment layer>Curves. Now make the curve as shown in the image below and then click on Clipping Mask icon (Encircled in the image below.)

And now we have successfully completed the process of selecting various skin tones in Photoshop CS6. Fascinating isn’t it? Certainly, it will be if you get acquainted with the process/steps with practice.


