
Creating a Grunge Portrait Effect In Photoshop
Using the levels, high pass filter, curves, etc, let’s learn how to create a grunge portrait effect with the help Photoshop! The version used for it is CS6. However, older versions can also be used for the same.
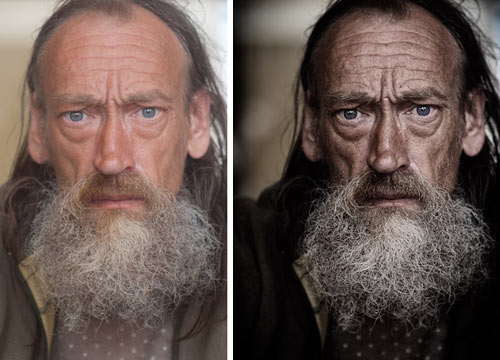
The image initially looks like this:
Contents

Step 1 to create a Grunge Portrait Effect in Photoshop:
Firstly, open the image in Photoshop. Crop the image to make it subject centric. To crop, do press Shift+C repeatedly until it appears. The encircled handles are to be dragged in order to crop the image and press Return/Enter right after it.
Step 2 to create a Grunge Portrait Effect in Photoshop:
In order t increase the Blacks in the image, add Levels to it which is one of the best technique to make the image look grungy! Select the following: Layers – New Adjustment Layers – Levels. Black Slider should be increased to 27.
After which, the image shall look like this.
Step 3 to create a Grunge Portrait Effect in Photoshop:
Create a new layer which shall contain all the adjustments by pressing Ctrl+Alt+Shift+E or Cmd+Opt+Shift+E. The results will be visible after the layer panel opened for which F7 can be pressed. A new layer with “layer 1” will be shown.
Step 4 to create a Grunge Portrait Effect in Photoshop:
To change the preset to Strong Contrast, press Layer – New Adjustment Layer – Curves.
The image shall look like this.

Step 5 to create a Grunge Portrait Effect in Photoshop:
Press the following: Layer – New Adjustments Layer – White.
The amount of the colours shall be as follows:
Magenta: -14
Blues : -49
Cyans : 15
Greens : 27
Yellows : 30
Reds : 18
The settings mentioned above are not mandatory. It can be changed as and when required and varies from image to image.
The resulting image shall look like the one shown below.
Step 6 to create a Grunge Portrait Effect in Photoshop:
Curves are to be added again for which, press Layer – New Adjustment Layer – Curves. Preset to be changed to Medium Contrast.
The image shall look like this.
Step 7 to create a Grunge Portrait Effect in Photoshop:
Group the adjustment layer, i.e., Black and White and also the Curve layer by pressing Ctrl/Cmd and choose both the layers which will select both layers.
Group it together by pressing Ctrl+G/Cmd+G and reduce the opacity to somewhere between 60 – 70%.
The image shall look like the one shown below.
Step 8 to create a Grunge Portrait Effect in Photoshop:
To add more details to this beard, press Ctrl+Alt+Shift+E or Cmd+opt+Shift+E. To change the radius, press the following: Filter – Other – High Pass and press “ok” after it is done.
Change to mode to Vivid Light from Blend.
Step 9 to create a Grunge Portrait Effect in Photoshop:
To the “layer 2” layer, add the Layer Mask by pressing as follows: Layer – Layer Mask – Hide All. From the Tool Panel, catch hold of Brush Tool and enable Layer Mask with the help of the same. Change the size as per the requirements and hardness between 20-30%. White shall be the colour of foreground.
The area highlighted with red colour should be brushed.

The image shall look like the one shown below.
Step 10 to create a Grunge Portrait Effect in Photoshop:
Everything but his face must be darkened by pressing Ctrl+Alt+Shift+E or Cmd+Opt+Shift+E. By pressing Ctrl+J or Cmd+J, to duplicate the same.
Change the blend to Multiply from Blend mode of layer 3 copy.
Step 11 to create a Grunge Portrait Effect in Photoshop:
The face has also got darkened. To fix this press as follows: Layer – Layer Mask – Reveal All. From the tool panel, take the Brush tool and make the hardness to 0%. Foreground colour should be set to black and start brushing all over the face and bread. After this, the image shall look like the one shown below.
Step 12 to create a Grunge Portrait Effect in Photoshop:
Final touches are on due! To do so, let’s decrease the saturation by following: Layer – New Adjustment Layer – Hue and Saturation. Set saturation to -37.
The image shall look like this.
Step 13 to create a Grunge Portrait Effect in Photoshop:
Time and increase the contrast a bit by choosing the following: Layer – New Adjustment Layer – Curves. Medium Contrast should be the preset.
The image shall look like the one shown below.
Step 14 to create a Grunge Portrait Effect in Photoshop:
The light should be added as the image has shifted to a darker end. To do so, press the following: Layer – New Adjustment Layer – Curves. Turn the preset to (RGB) Lighter.
The image shall look like the one below.
Finally, we have achieved the grunge portrait using the simple tools provided by Photoshop. Anyone could achieve this effect by following the steps illustrated with pictures, as above.


