
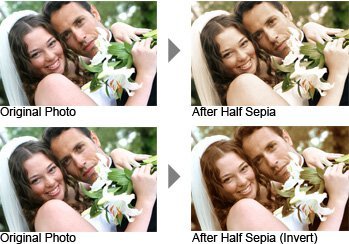
Generating Half Sepia Effect Using Photoshop
The applications and benefits of using Photoshop are endless. There are no limits on a number of actions and tools Photoshop provides to satisfy our craze of photographs. The possibilities of creating new effects are huge, and we are grateful that there is some software that gives us that incentive. The half sepia effect is a special effect that looks very good for Portraits and in some cases for landscape images as well. In this article, we shall learn how to create half sepia effect using Photoshop CS6. Here are the steps to create the half sepia effect:
- The first step we do to create the half sepia effect is to crop the image to cut off unwanted portions in the Photograph.

- After you have cropped the image, press Ctrl + J/Cmd + J to duplicate the layer. This will show up in the Layer Panel only. Rename the layer as ‘Spot healing’.

- Now go to the Tool Panel and click on Spot healing brush Tool. Now reduce the brush size to 35 pixels and the hardness percentage to 0% and then brush over the acne area.

- Now we are going to duplicate the ‘Spot Healing’ layer again by pressing Ctrl + J/Cmd + J, and we rename this newly Duplicated Layer to ‘Gaussian Blur’. Now click on Filter>Blur>Gaussian Blur and set the radius to about 10-15 pixels and then click on Ok. Then change the blend mode of ‘Gaussian Blur’ layer to ‘Soft Light’.

- The next step in creating the half sepia effect involves applying a layer mask to the Gaussian Blur layer. Click on the Gaussian Blur layer to activate it. Now click on Layer>Layer Mask>hide all. Now go to the Layer Panel and click on Brush Tool. Then set the Foreground Colour as White. Change the Brush size to 100 pixels and set the hardness percentage in between 20 to 30. Now apply the brush on the skin.

- The next step is to press Ctrl + Shift + N/Cmd + Shift + N to create a new layer at the top of the layer panel. Now go to Tool Panel and Click on Brush Tool. Now reduce the brush opacity to a percentage of about 15-25. Now zoom in the image and open the Eyedropper Tool by holding down Alt/Opt key. Now move the mouse over her cheek and left click on the mouse. The average colour will be selected by the Eyedropper Tool. Now you can release the Alt/Opt key. Now apply brush over her cheek in the image.

- Now proceed according to the following steps:
- Press Ctrl + Shift + Alt + E/Cmd + Opt + Shift + E to create a new layer in the Layer Panel. Now click on Window>Channel. Then click on the Red Channel. Now press Ctrl + A/Cmd + A to select the whole image.
- Now press Ctrl + shift + N/Cmd + Shift + N to create a new layer and rename it as ‘Red Channel’. Now press Ctrl + V/Cmd + V to paste the image. Now hold the Ctrl/Cmd key and click on the layer thumbnail of ‘Red Channel’ to select the red channel present in the image.
- Now click on Layer>Layer Mask>Reveal Selection.

- Press Ctrl + shift + alt +E/Cmd + Alt + Opt + E to select Stamp Visible. Now click on Filter>Other>High Pass and set the radius value to 10 pixels and then click on OK.
Now change the blend mode to Overlay. Then click on Layer>Layer Mask>Hide all. Now go to the Tool Panel and click on Brush Tool. Now modify the Foreground Colour to White and change the Opacity percentage of the Brush to 100% and then start applying the brush on her hair, eyes, nose and lips.

And we are done with creating the half sepia effect in Photoshop CS6. It is agreed that the steps are not so easy, but things will go along smoothly if the above steps are practised for a few times. Screen shots will make it easy for you to create the half sepia effect in photoshop.


