What is perspective crop in Photoshop and How to use it?

Perspective is a representation of an object as an image as seen by an observer. At times, the effects of the photograph can be changed by changing the perspective of the image. This is particularly applicable in the case of architectural images having long buildings. A Skew perspective somewhat reduces the attractiveness of the image. Thus, it is very important to be able to change the perspective of the image. In this article, we shall throw some light upon the Perspective Crop tool available in Photoshop.
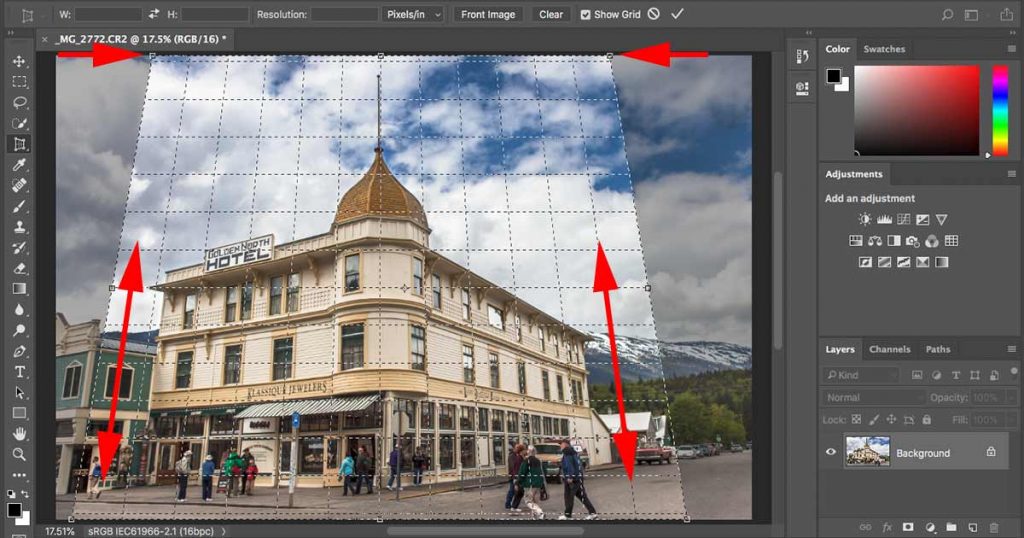
- First, upload the image into Photoshop. Then go to the left tool panel and select the Perspective Crop Tool option. The next thing to do is to click on View>New guide. The ruler can also be used to do this by dragging it to the bottom from the top. In case the ruler has not been activated, it can be activated by pressing Ctrl + R. Then select the whole image using the Perspective Crop Tool by dragging the mouse from the top left to the bottom right.


- Next, click on the top left corner handle. In the image shown, drag the handle in such a way that the grip is parallel to the window. Then ensure the coincidence of the handle and the guide. The same process is repeated for the right side as well.


After this, press Enter/return. And now we are done with changing the perspective of the image.

By this method, we will be able to change the perspective of the image successfully. The next step of understanding the Perspective Crop Tool is the understanding of Advanced Settings. The Perspective Crop tool comes with an option bar of its own.
The various options available in the options bar are:
-
Contents
Width and Height (W and H)
This option determines the width and height of the image. The default value of this option is the dimension of the image uploaded in Photoshop.
-
Resolution
Resolution determines the number of pixels per inches in the image. The quality is bettered by the presence of a larger number of pixels. However, the size of the image file is also increased due to the increase in the number of pixels.
-
Front image
This option helps to crop two images to the same aspect ratio at the same time. Just crop one image and click on this option and the other image will be cropped too in the same ratio.

-
Clear
Clear option removes the value of the Width, Height, and Resolution of the image.
-
Show Grid
This option shows the grids done to the image. Turning off this feature will not show any grids in the images as shown previously in the images in this article.
We have now successfully studied the Perspective Crop Tool in Photoshop and the various options and features associated with it. As we can see, the options are fairly simple and easy to understand.


